Installation
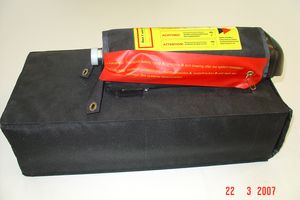
New modification of the rocket fixing without the fabric cover.
VALID FOR REVISION
WARNING!
RELEASING OF THE TRANSPORT SAFETY PINS DURING AND AFTER THE INSTALLATION
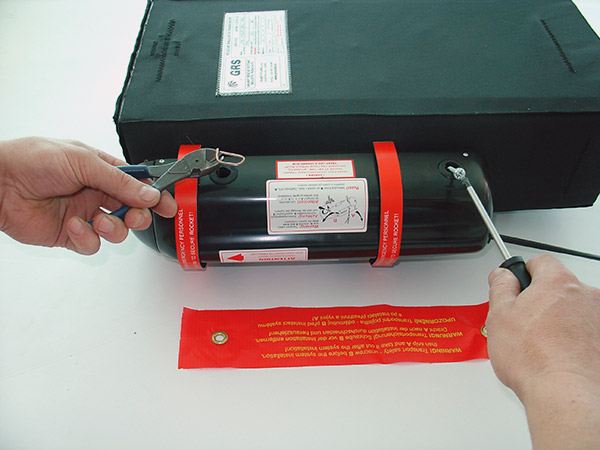
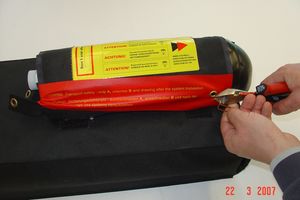
These two transport safeties are firmly connected between themselves by the little red flag and must be step by step taken out!
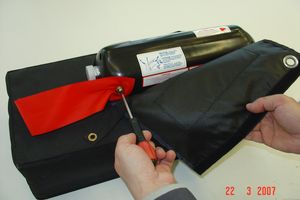
After unpacking you first unscrew the safety B in the rocket tube rear part but leave the red little flag attached until the system is installedand (in case of modification Soft, it is necessary to lift off the upper fabric cover of the rocket tube on velcro zips and take out the bolt M5).
After the system installation you snip the wire safety A , take it out and remove the flag and the system is now secured only by the operational pin with the flag on the handle.It is released by pilot shortly before flight and after the flight applied again so that the handle is secured against possible activation
WARNING: If the cockpit cannot be locked then the handle must be locked.
Packing of product

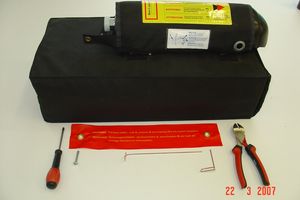
- Transport saf1. Safety A- of steel wire diameter 2 mm, B M5 bolt.
- Transport steel basket.
- Operational safety pin with little flag.
- Transport screws 2 x M5.
PŘED EXPEDICÍ NÁS PROSÍM KONTAKTUJTE !
Avant l´achat merci de nous contacter!
SZÁLLÍTÁS ELŐTT ÉRTESÍTSE A GYÁRTÓT!
PRIMA DELLA SPEDIZIONE CONTATTATECI!
Przed wysłaniem systemu skontaktuj się z producentem aby uzyskać najnowsze informacje.
Before installation the user must read and understand this manual. Failure to do this or overlooking important information while installing or maintaining the system in accordance with the instructions and advice in this manual could result in personal injury or death to you or your passangers and damage to your aircraft. If you have any questions or are unsure of any part of this manual, get advice from an agent or the factory before proceeding.
Galaxy wishes you to fully understand the proper use of the GRS for your safety and that of your passengers. Do not replace any part with a similar part you may have obtained elsewhere. The manual is explicit in the proper mounting procedures required for safe installation and in the proper use of the system. Do not under any circumstances vary from the described methods or components supplied without first getting approval from Galaxy.
POSSIBLE INSTALLATIONS FOR OTHER TYPES OF AIRCRAFT

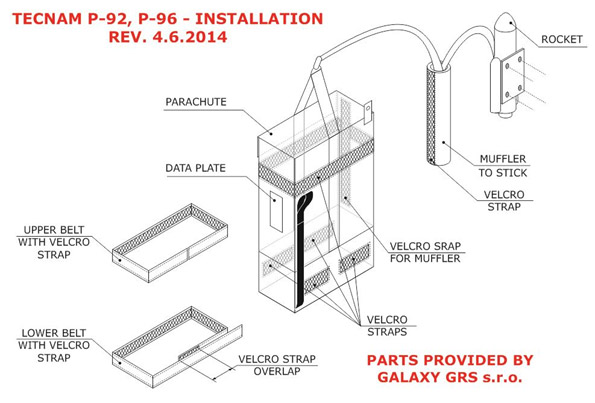
TECNAM P-92, P-96 - INSTALLATION
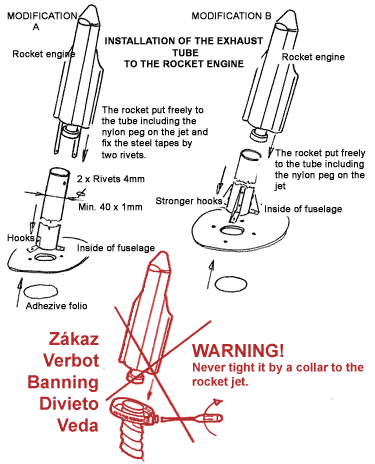
According to new verified GRS Galaxy installation, there is no need for duct to carry the combustion gases out of the fuselage!!!
This parts are provided by Galaxy GRS s.r.o.:
NOTE: The assembly provided by Galaxy GRS s.r.o. already contains two belts with Velcro® straps.
Because of its peculiarities, the GRS Galaxy rescue system needs some extra care during its installation. In fact:
- The parachute’s bag must be fastened so as to lift-off without hindrances.
- According to our latest findings, there is no need for duct to carry the combustion gases out of the fuselage! Critical factor is the vertical position of the rocket in the box. This is the major change in this installation manual revision. See more details below.
Rocket and Parachute’s bag lodging and fastening
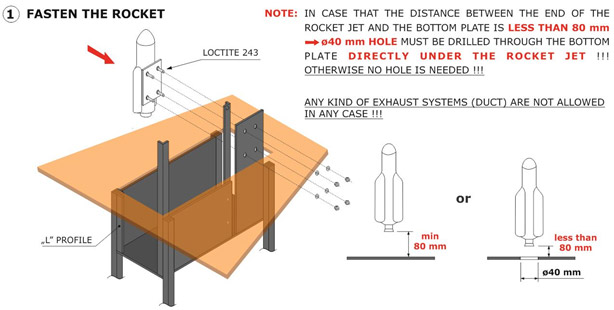
- Fasten the rocket by using 4x M5 self-locking nuts and washers. Use a thread locker Loctite (243 Medium strength). There is no need for duct to carry the combustion gases out of the fuselage. Critical factor is the vertical position of the rocket in the box. Under the rocket jet there must be a free volume for combustion gases dispersion. In case that the distance between the end of the rocket jet and the bottom plate is less than 80 mm, 40 mm diameter hole must be drilled through the bottom plate. This will provide a sufficient pressure release.
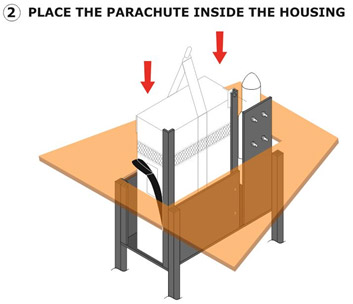
- Set the parachute’s bag at the left side of the box i.e. the side with the two “L” shaped stringers.
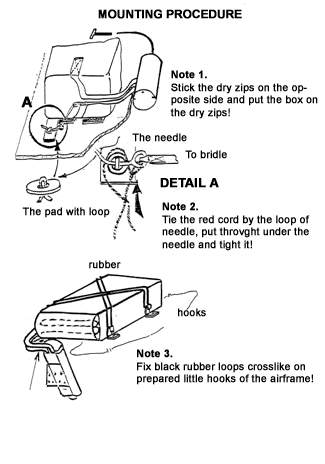
- Secure the parachute´s position with lower and upper belt with Velcro® straps. These belts must fit with opposite Velcro® “hooks” on the bag and must be pressed properly. The upper belt must wrap the parachute’s bag fastening it to the stringers but not wrapping the rocket. It does not have an overlap. Because of the plate which is between the parachute´s bag and the lower belt, the lower belt has 3-5cm overlap. Unused lower belt ending should be cut off. The lower belt must never interfere with the parachute’s bag bail out process. Safety needle must be applied (detail A).
NOTE: This installation of the lower belt is valid for a box with 2 solid sides only according to the picture below.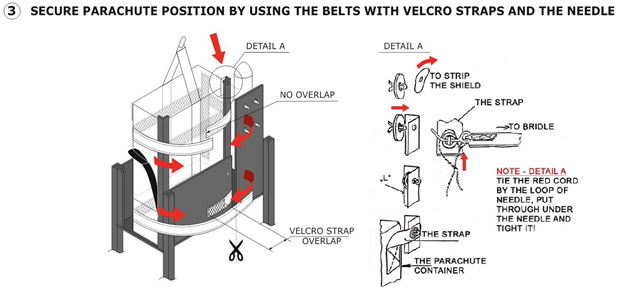
- Stick the muffler of impact
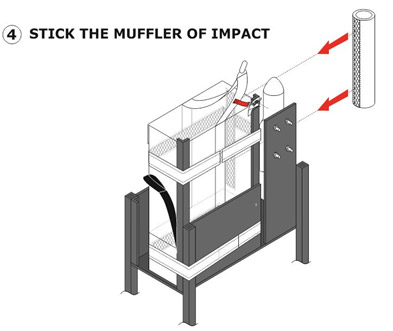
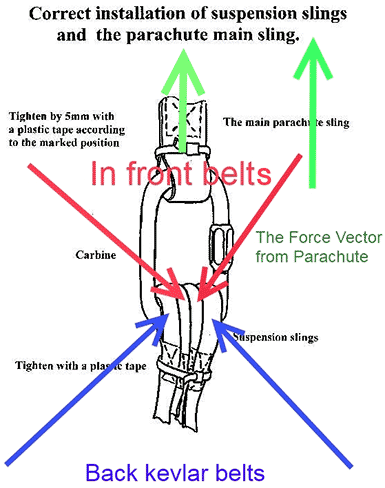
- Final assembly
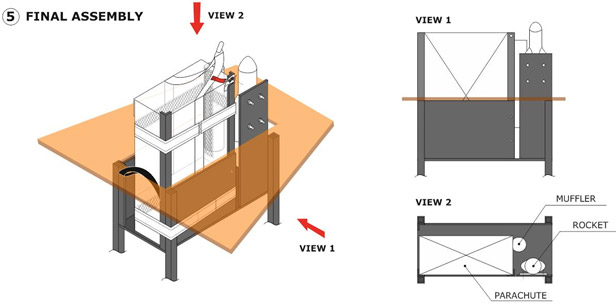
- These aircrafts don’t have any stringers coming up from the top of the tail cone. Because of this it will be necessary to proceed as we did on the lower belt. The Velcro® tape should wrap up the parachute’s bag with the aluminium box. If necessary it is also possible to drill a 10x35mm slot into the aluminium box exactly in height of lower Velcro “hooks” on the bag (without damaging the bag) to pass through the belt without wrapping the rocket. The purpose of this installation is to introduce a “disconnection point” into the upper belt which must never results as a hindrance to the parachute’s bail out, while fastening the bag. Therefore the belt’s overlapping length must be limited to the strictly necessary, e.g. about 3-5cm.
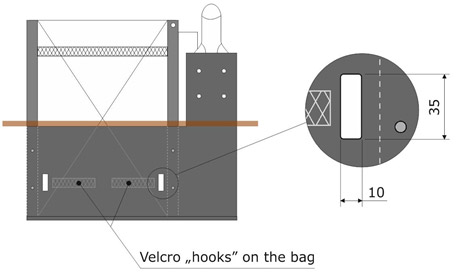
Note for lower belt with Velcro strap Installation on P92/96/RG in case that the aluminium box has all sides solid:
Download: Emergency parachute installation on Tecnam ultralight aircrafts.
P92 Echo, P92-S Echo, P92 EchoSuper, P92 ShortWings, P92 SeaSky, Astore, P2008
P92 Echo 2000 RG, P96 Golf, P2002 Sierra


